Temperature control is considered to be among the most fundamental skills any person who is still cooking with charcoal needs to master.
There are several amateur pit masters who have fired up their brands’ new charcoal smoker only to waste their good meat just because they didn’t have an idea of how to control their temperatures.
However, you should never worry, with the basic understanding of how the temperature control function, you will be more equipped with the knowledge on how you can go out and start mastering your pit. Thereafter, you can join the tradition of looking down on individuals who cook on the much easier pellet, electric or gas grills.
Using the Air Vents to Control Smoker Temperature
Having a steady smoking temperature will be more beneficial for a fully smoked, cooked, tender meat. In most of the low and slow cooking, what we need to do is see how we can get our smoker to range between 225 – 250°F and try keeping it there for 4-16 hours.
There is a lot that is involved in temperature control other than firebox loading up. It is important for one to know how to make most out of their smoker air vents.
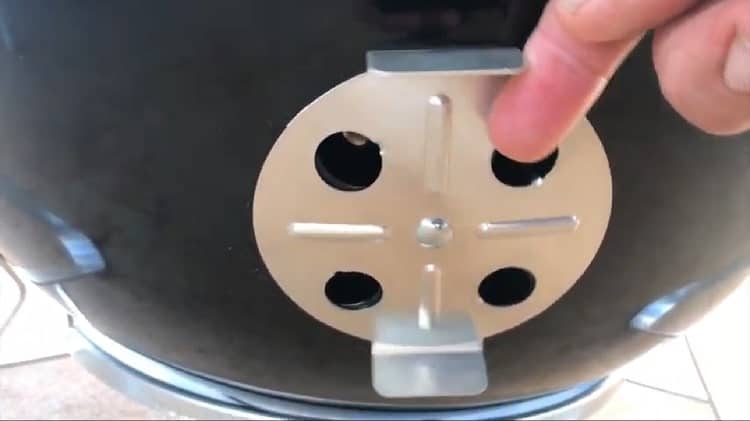
Majority of the smokers are known to have two vent types. One is located at the bottom while the other is located at the top. The intake vent is that one that is usually situated at the bottom near and under the firebox. The exhaust vent is the top vent.

Air comes through the intake vent with the warm air circulating from the firebox out through the exhaust vent. Since hot air rises, the exhaust vent will act as vacuum being tasked with drawing air into the intake vent. The hot air will heat up the smoker as it rises up.
Meathead goes into more detail into how the intake and exhaust work over on amazingribs.com
Meathead Goldwyn, Using the Vents to Control Temperature on Charcoal and Wood Burning Grills and Smokers
The intake damper is near the charcoal or wood and its job is to provide them with oxygen. The intake damper is the engine that drives the system. Close it off and you starve the fire and it burns out even if the exhaust damper is open. Open it all the way and the temperature rises. On most grills and pits you control temperature mainly by controlling the intake damper.
The exhaust damper (a.k.a. flue, vent, or chimney) has two jobs: (1) Allow the combustion gases, heat, and smoke to escape, and (2) pull oxygen in through the intake damper. This pull, called draft, is created by hot gases rising through the chimney trying to escape.
The exhaust damper needs to be at least partially open at all times in order to keep combustion gases from smothering the fire like a wet blanket of CO, CO2, and other combustion products.
Right Method of Adjusting Smoker Temperature
As you already know, the right way of controlling your temperature is by adjusting the intake dampers. However, before you start opening, closing them and overshooting. Geeks with Fire give the best explanation so far.
A vent system and a smoker’s firebox can be compared to a big truck with small engine. It will take you some time before you manage to get the truck to speed. Immediately you get it to speed, it will be difficult to slow it down due to the truck size, momentum and gravity.
In the same way as the truck, the smoker too will take some time to get to the right temperature. Immediately the temperatures start rising, it can grow rapidly. When you get to the temperature, you will have difficult time getting back. This is known as overshoot. No one likes the idea of overshooting their target temperature.

It is advisable that you make some adjustments before it’s late as this will ensure you avoid overreacting and overshooting the temperatures you were aiming to get to.
Below are some main factors you need to keep in mind when adjusting Intake Damper
- Take note of how fast the temperature is rising. The faster it rises, the sooner you will have to take action.
- Are you interested in backing off your temperature? Adjust the intake vent to a closed position. This will allow less oxygen to heat up the smoker thereby causing temperature to rise at a slower rate.
- Do you think your smoker is not hot enough? You will first have to ensure that you still have charcoal in the firebox. In case you have been running the smoker for hours, a gentle stir may be enough to help back up temperature. There are times when you will be forced to add more fuel.
- You need to avoid over adjusting the vents. Give it enough time when you make an adjustment before you add another adjustment.
Perform Dry Run on the New Smoker
Our main aim is not blow the whole pay check on an already ruined meat. One way you can achieve this is to ensure you have full control of your barbecue every time. It means you have to know how you can get it a safer smoking temperature that ranges between 225 – 250°F and how you can hold it there. It also means that you will have to know how to make adjustments when things are not going right. It is advisable for one to take their smoker for trial before they load it up with meat. Smokers do work differently and the time it takes for different types of smokers to get to their target temperature varies also.
Most smokers coming with built in thermometer which can be of up to 50°F off the real temperature where your meat will be waiting. This explains why it is advisable to use a dedicated thermometer to help keep track of the temperatures.
Feel free to take notes on how long it will take for your smoker to get up to temperature. Thereafter, pay careful attention on how the vents function and how adjusting it will result in the large temperature swings.
What to do when you see the Thick and White Smoke
The thick and white smoke is an indication and your wood is not burning as it should. The smoke that comes from the exhaust vent needs to be blue and thin in color. The thick white smoke will bring a bitter and undesirable flavor on your meat. The damp wood is popularly known to be the most affected whenever the thick and white smoke is visible.
- Try avoiding using the damp wood.
- Adjust the intake vent to allow in more air flow.
- Increase in the flow of air will help in ensuring a hotter fire hence, your wood will combust and burn quickly.
How Weather can affect the Smoker Temperature
Weather is known to play an integral part when one is smoking. In fact, it can be an even bigger factor when cooking using a poorly or cheap insulated smoker. For example, a windy day will make more air flow through the intake vent thereby causing hotter fire.
Cold weather can make one to lose more heat through the smoker walls. Ensure that you always keep more fuel at hand than you usually do.
Smoking is just not restricted to the summer although you should never allow bad weather to put you off. Ensure you account for wind by placing your smoker in a sheltered position. You can also consider closing your vents off slightly more than usual.
Turn the Charcoal Smoker into ‘Set It and Forget It’ Smoker Using an Automatic Temperature Controller

You have now learn how you can control your smoker’s temperature by adjusting the air vents to get your desired temperatures.
Since this will help you get reliable barbecue low and slow temps, you will be getting the frequent flare up. All you need is changing the direction of wind especially when your smoker is on the leaky side. This will make you experience dangerous heat rush.
Instead of babysitting your smoker all day long and maybe all night, there are bright individuals who have invented a device to help you do this.
The automatic temperature controllers function by connecting to the smoker and regulating flow of air to ensure steady temperature is maintained. They help take away the guess work out of the ever changing air vents.
In case you like to stay warm and comfy in bed or side as your foods smoke, the units are a life saver. Wi-Fi connection will enable you to keep an eye on the temperature and adjust the right tempo on the fly. The unit also comes with more features which will allow you to produce graphs and logs that will impress the geekier barbecue mates.
Four Ways you can Use to Control Heat
There are four effective techniques you can always use in temperature control. Understanding these techniques will mean you are on your way to grilling greatness. Depending on the way you use your grill, you will end up relying on one or two of these temperature control methods. However, it is still important for one to know all the available options.
Create a Two Zone Fire
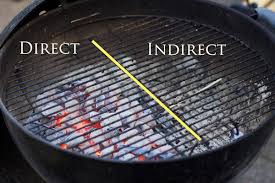
When you build a cooler zone for indirect cooking and a hot zone for searing, you will be in a position of taking control over how well your cooked meat is just by moving it to the right side of the cooking grate.
Here are some of the things you will have to do in order to create a two zone fire:
- You will have to place all the coals on one side of the coal grate.
- Ensure they are evenly spread across ½ to 2/3 of the area.
- Replace the cooking grate.
Your direct cooking or grilling area is the area that is directly above the coals.
In case you intend to stop grilling your food or interested in cooking indirectly, all you have to do is move the food across to the grate side without coals below it.
The food that is sitting in the indirect cooking zone will be cooked using convention method. It means warm air circulating around the food. This will ensure the meat is cooked both in and out and not just on its surface.
Reduce or Increase airflow by adjusting grill vents
Below is a rule of thumb:
- Whenever you are cooking using charcoal the more the flow of air the hotter the grill will be.
- In gas grills, the opposite is true. Here the heat will escape when you open the lid.
- It is important that all the vents remain fully open when you are starting the grill. In order to get coals glowing, you will need lots of oxygen.
- Grills do have vents located at the top and bottom. The bottom vents are referred to as the intake dampers as they are tasked with providing airflow to the coals.
- The vents located at the top are referred to as the exhaust dampers and they are tasked with taking the smoke away just like a chimney. When they do so, they will help suck the air through the grill ensuring they are kept open which promotes flow of air though the whole system.
Will one be required to adjust the top exhaust damper or the bottom intake damper?
There are two main arguments concerning this question.
- First, you can decide to leave the exhaust damper on the lid wide open and use the bottom intake damper to control the airflow.
- As recommended by Weber, you can decide to do the opposite and leave the bottom damper wide open and use the lid exhaust damper to help you control the temperature.
- All the two approaches will work and it all depends on what you are interested in. There are people who prefer leaving their exhaust dampers open and adjust the intake dampers.
- In both scenarios, you should not close off the top vent (exhaust damper) completely especially when cooking since the gases and smoke needs to escape.
- Adjust the distance between the coals and your food
- The closer the coals are to the food you are preparing, the hotter it will get and the faster it will get cooked. However, you need to realize that this is not rocket science and it will take you some trial runs to know where the sweet pot is.
There are grills that have adjustable cooking grates that will make life easier. All you have to do is move the food further away in case you have a feeling that it is getting too hot and vice versa.
In case your grill lacks this feature, don’t worry, there is always a way around it. You can decide to use the first method to create two or more fire zones. Thereafter, you can decide to move your food between the cooler or hot parts of the grill.
Use Grill Shield
In case things are getting cooked faster than expected and you have to do something about it fast, you can decide to create an aluminum foil shield to help in blocking the heat.
- Grab the foil.
- Fold it over 2-3 times.
- Slip it under the food piece that you are about to burn.
This method will not prevent the food from cooking completely. However, by blocking the radiant heat amount hitting your food, you will be able to slow down the process.
Temperature Control during ‘Low’ and ‘Slow’ cooks
All the four methods listed above will work great whenever you are grilling at higher temperatures. In case you are interested in using your grill as a smoker, there are extra tactics that you need to know. The secret behind successful low and slow cooking on grill mainly rely on the set up.
Setting up the grill

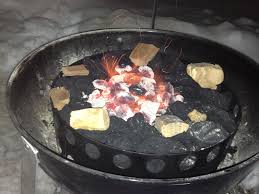
Minion method is one of the most popular ways you can use to help you set up a grill for long cooks and low temperatures.
The minion method comprises of lighting smaller amount of coals and adding unlit coal. The lit coal will slowly start to light up the unlit ones.
Here is the logic behind using this method:
The temperature will be starting quite high when you put a whole chimney load of lit coals in the grill. You will begin to struggle on bringing it down before you even start thinking about introducing food.
When using the minion method, the grill is in a position to quickly reach the perfect smoking range of between 225-250 °F where it will stay for several hours.
You will still be in a position to continue using the charcoal chimney to light the coals when you are using the minion method. All you have to do is flip the chimney and use smaller chamber to help light up the coals.
The snake method is another common method.
Direct vs. Indirect

It is possible for one to cook low and slow on a grill by using both the direct and indirect cooking methods. It does not matter which way you will want to use for cooking, you will have to look at things differently.
The unlit coals are the fuel source while the lit coals are the heat source.
Direct Cooking
In case you are planning to cook something for more than 30 minutes using direct heat, follow the tips below.
- Ensure you light enough coals to help you bring the grill up to the right temperature. This should be around five lit coals which will get you to 225-250°F.
- Evenly spread the unlit coals on one of the sides of coal grate.
- Equally place the lit coals among the unlit coals.
- Place your food on top of the coals and place a lid on top. Replacing the lid will help in controlling airflow and prevent the coals from getting too hot.
You will have your food cook evenly without burning when you evenly spread the coals and reduce the lit coals numbers.
Indirect Cooking
You will be using indirect cooking for most of the low and slow cooking.
You will have to control the amount of lit coals you use when cooking indirectly on a grill. Five coals will mean the grill is sitting at a temperature of approximately 225-250°F. However, it has a different set up to cooking over direct heat.
- Have the unlit coals placed in a pile on one side of the coal grate.
- Ensure five lit coals are placed together in the center of the pile of the lit coals.
- Have the food placed on the opposite side of the cooking grate to the coals piles.
- Thereafter replace the lid.
In case you intend to cook for longer time, you will have to increase the unlit coals amount. If you need to cook at higher temperatures, then you will have to
If you need to cook for longer, increase the amount of unlit coals. If you want to cook at a higher temperature, increase the amount of lit coals.
It is important that you try taking advantage of both direct and indirect heat whenever you are preparing a thick steak. You can do this by trying to reverse sear. You can bring up the inside of the steak to the temperature by use of indirect heat before moving it over to see of direct heat and obtain a great crisp exterior.
Conclusion
I am sure that you now feel more confident in using vents on your smoker to help control temperature. However, you need to remember that there is no substitute to practice! Experimenting with your new smoker in different conditions is one of the best things you can do.
In case you are using a Weber Smokey Mountain to cook, then there is a better guide to all the factors that might be making the smoker run cold or hot. Otherwise, feel free to inform us by commenting below in case you have suggestions or tips which you think we have missed.
Last Updated on August 6, 2020 by Judith Fertig

Leave a Reply