Every backyard pitmaster wants to master barbecue ribs.
There’s something magical about ribs that makes people dedicate their whole lives to perfecting their recipe.
There are lots of great rib recipes out there (like own guide to competition style ribs), but I think learning about the pros and cons of each cooking methods is will help you perfect your own rib recipe.
Types of Pork Ribs
I’ll be honest. When I first got into barbecue I had no idea there were different types of pork rib.
It wasn’t until I started buying meat from proper butchers that I realized how many options were out there for a rib fiend.
Learning about the four popular cuts of pork ribs and how they butchered and trimmed is a great shortcut to mastering barbecue ribs.
So grab a coffee (or a beer) sit back and learn everything you never knew about the different types of pork ribs.
The 4 Main Types of Pork Ribs Explained
We can’t talk about the different cuts of pork ribs without looking at the anatomy of the pig.
Each pig has 14 rib bones which are attached to the spine and divided into the four most popular cuts.
- Baby back ribs
- Spareribs
- Louis cut ribs
- Rib tips
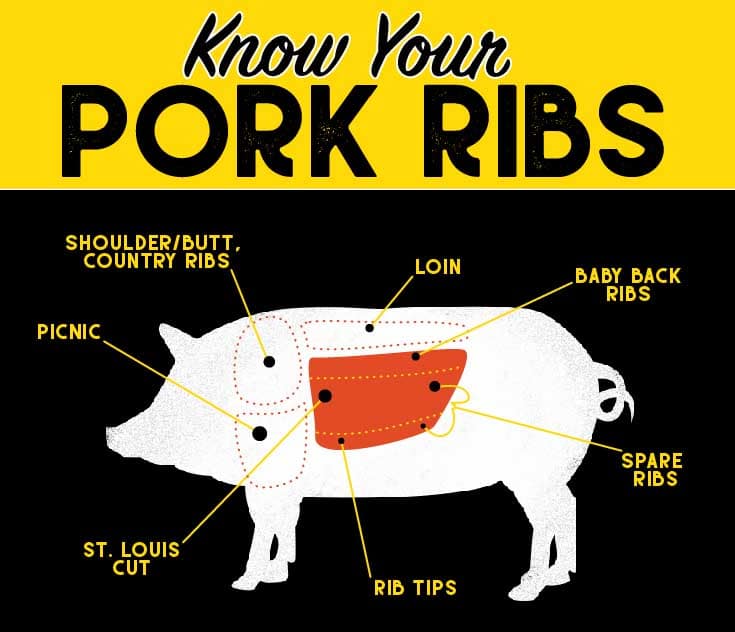
The type of rib will depend on it has been trimmed, and the section of the rib cage from which it has been cut.
Each type of rib has its own distinct characteristics, and ways to prepare.
1. Baby Back Ribs
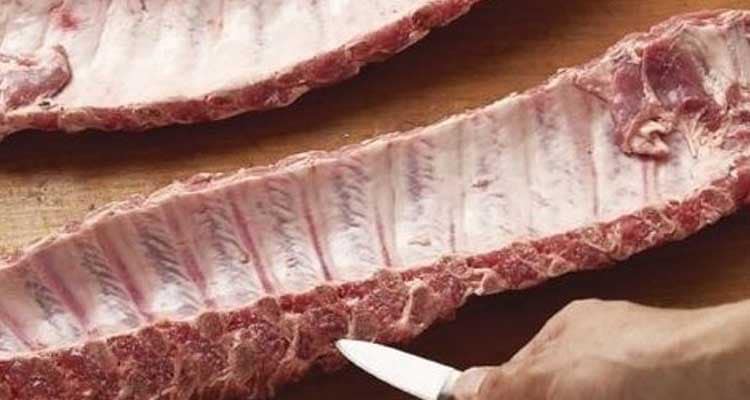
Baby back ribs are from the highest part of the pigs back, and are directly connected to the backbone of the animal.
Just to be clear, these ribs have nothing to do with piglets. The word “baby” refers to the fact they are smaller than spare ribs. “Back” refers to the fact that they are attached to the backbone of the pig.
They are also sometimes referred to as “loin back ribs”.
Distinctive Features:
- Baby back ribs tend to be leaner than spare ribs.
- They usually range between 3 to 6 inches in length from long end to short end
- They have a distinctive bend at the top where the rib meets the spine.
How to prepare baby back pork ribs
There are so many great ways to cook baby back ribs. All good recipes will include the same basic steps:
- Look for ribs that are around 1 inch thick with plenty of meat
- Trim any meat dangling from the bone side
- Slide the tip of a knife under the membrane and over the bone
- Using a paper towel carefully pick up the edge of the membrane and peel it off
- Season both sides with your favorite barbecue rub
For more detailed cooking instructions I highly recommend this guide to cooking barbecue ribs.
2. Spare Ribs
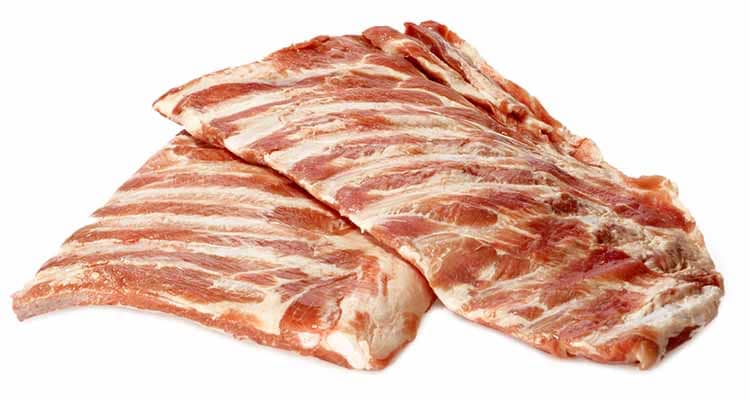
Spare ribs are from further down the side of the pig, and reach right down toward the breastbone of the animal. They are also referred to as “side ribs” or “spares”.
These are probably the most popular type of rib, and when people refer to “ribs” without specifying what type, there is a good chance they are talking about spare ribs.
Distinctive Features:
- Spare ribs are flatter and straighter than baby back ribs.
- On one end you will see the marrow of the bones where they have been cut away from the baby back ribs.
- The other end is where the ribs taper away at the chest of the animal. At this end of the ribs you will see a slab of meat, along with some cartilage and gristle.
- Some would say that spare ribs have richer, more flavorful meat than baby backs. But whether or not the meat is superior or not is really a matter of your own personal taste.
How to prepare pork spare ribs
You can prepare spareribs the same as baby back ribs just increase the cooking time. While baby backs can be finished in 3 to 4 hours, with spare ribs allow 5 – 6 hours.
For a great pork spare ribs recipe check out this video from HowToBBQRight.
3. St Louis Cut Ribs
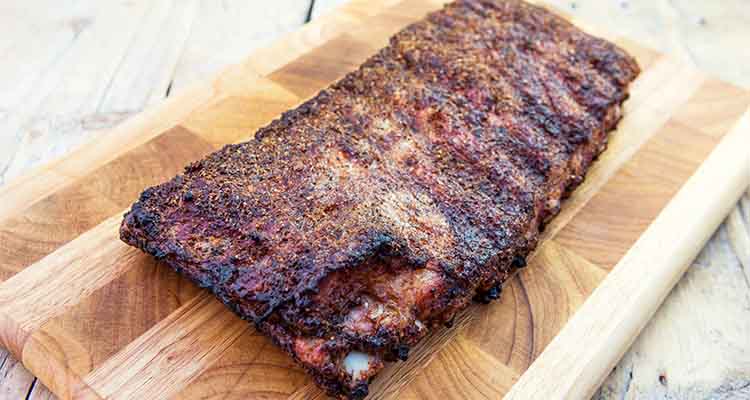
St Louis cut ribs are basically spare ribs, trimmed up a little more. This cut of rib is preferred on the competition circuit, as it is neat and tidy for presentation.
The meat is pretty much the same as that you would find on spare ribs, minus the cartilage and gristle you find at the bottom of the spares.
The name came about in the mid 20th century when meat packers from St Louis started to cut their meat this way.
Distinctive Features:
- St Louis cut ribs are longer than baby backs and shorter than full spare ribs.
- You most likely won’t come across these in the supermarket, they are a generally more of a “specialty” item.
- While the shape of the bone is essentially the same as the spare rib, the fact that they are trimmed up more makes them look more regular in shape than other types of rib.
How to prepare St. Louis ribs
Getting the St Louis cut in your local grocery store may not possible. But you can trim up some spare ribs yourself if you like St Louis cut ribs.
This video has a great run down of how to do. We have also broken it down step by step for you below.
But before you start, make sure you have a sharp knife – this will make the whole task much easier.
- “Square up” your ribs. This means cutting off the pointy looking end of the ribs to make the rack rectangular in shape.
- Turn the ribs over so the bone side is facing up. You will notice a flap of meat. This is called the skirt. Trim this off. You can keep this meat and cook it with the ribs. It will be done about half way through the cook.
- Have a look for any other fatty protuberances that can be trimmed up.
- Take off the membrane as described in the section above.
- Feel for the point that the bones end within the meat.Cut along this line to make the rack pretty well rectangular in shape, in line with the ends of the bones.
- The meaty piece that you have taken off is sometimes referred to as the brisket of the pork. At other times it is called rib tips. Either way, it can be cooked and eaten as well, so don’t throw it away!
What you have now is a St Louis style cut! Congratulations,it is neatly trimmed and ready for the smoker.
Once trimmed up you can cook them however you like, I like this recipe.
4. Rib tips
Rib tips refer to the small bones and cartilage that connects the front ribs to the breast bone.
They are cut from the lower ends of spare ribs when butchering St. Louis cut ribs. Don’t confuse rib tips with riblets which are actually not ribs at all!
Rib tips used to be discarded as waste, but have started to make a big comeback.
Distinctive Features:
- Rib tips are usually 8 – 12″ long and 1 – 3″ wide.
- Because of the cartilage they are extra chewy, and are often served chopped into chunks
How to prepare rib tips
If you don’t want to buy the full spare rib and trim your own rib tips, you should be able to buy them from a good butcher.
Smoked rib tips make delicious appetizers, and can cook in 2-3 hours. They can also be used for Asian style recipes like these delicious Chinese rib tips.
What about country style ribs?
Don’t be fooled. These really are not actually ribs.
They are from the front end of the baby backs, near the shoulder. In reality they are chops, and that’s how they should be treated.
Distinctive Features:
- Compared to ribs, there will be a lot of meat on the bones of country style ribs. This cut will usually come with one or two bones in the meat.
- Country style ribs have more meat and less bone than “real” ribs. This cut will go very well brined and then cooked low and slow, or reverse seared.
Other types of pork ribs
While the United States Department of Agriculture has specified some cuts of meat, a lot of the different names and cuts you hear are made up over time and vary by location.
Here are some of the common names you’ll hear:
- Back ribs / loin ribs– Both refer to baby back ribs
- Kansas city style ribs– Similar to St. Louis style but not trimmed as closely
- Riblets– Made by taking a full slab of ribs and cutting them so the bones are only half as long. This makes smaller portions which are pefect for appetizers or kids
- Button ribs– Often confused with rib tips, these were made famous by Applebee’s. Thin strips of meat and bone are cut from the side of the pigs spine.
Preparing Ribs
Before you can start thinking about applying your rub, you need to get your ribs ready. This means trimming them into an even shape and removing the membrane.
If you’re not sure what type of rib to use, we have a detailed guide to the different types of pork ribs.
Removing the Membrane
Regardless of how you plan to cook your ribs, you should take the time to remove the membrane.
For the uninitiated, the membrane is a thin layer attached to the surface of the inside of the ribs. It looks a bit like latex.
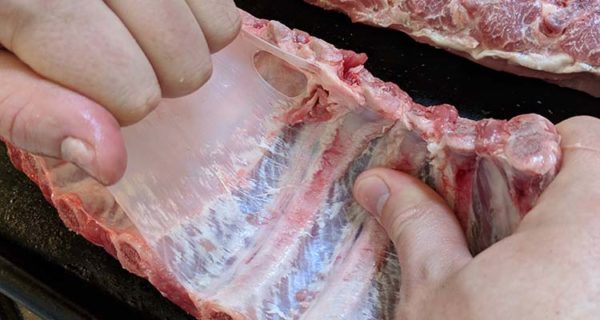
Removing the membrane also helps your rub hit the meat
When cooked hot and fast it becomes tough and chewy. When cooked low and slow it becomes rubbery. Also, if it is not removed before cooking, the fat underneath it cannot drain away.
Thankfully, it is not hard to remove. All you need to do is slip the tip of a knife or the end of a spoon under the edge of the membrane to get some leverage, and pull it up.
If you are lucky (or have done it a few times before) you might be able to get it off in one piece, but don’t be surprised if you need to take it off in two or three strips.
A good tip is to use some paper towel to get a good grip on the membrane. It is slippery, and pulling it off with your bare hands is likely to end in frustration.
Trimming ribs
Generally trimming involves taking off any stray flaps of meat that you find hanging off your ribs.
They will only burn, and won’t taste good.
You might also look for excessively fatty parts on the ribs and slice them off too. If you are cooking for friends, you need not be too fussy when trimming up your ribs.
Of course, it is a different story if you are preparing ribs for a competition.
The best ways to barbecue pork ribs
There are lots of ways to cook ribs. You could even boil (shudder) your ribs before grilling them.
In this guide we’re focusing on the best methods to prepare ribs for low and slow cooking.
Let’s have a look at some popular ways to cook ribs low and slow.
How to smoke pork ribs using the 3-2-1 Method
The name 3-2-1 is a description of the cooking times required for each stage of the cook.
Three hours smoking unwrapped, two hours wrapped, and then one hour unwrapped again.
When we say wrapped we mean wrapping the ribs in aluminum foil. This method is also sometimes referred to as the ‘texas crutch’, a way to tenderize and increase cooking speed.
The 3-2-1 method is a popular way to cook ribs because it makes it hard for them to dry out, and it produces a style that most people will love.
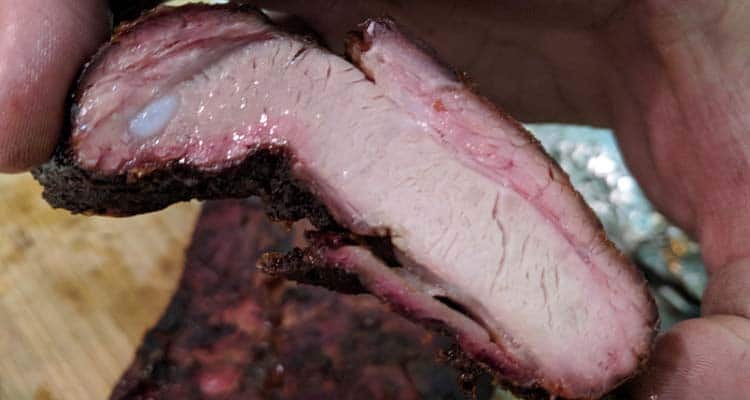
As long as you stick to the method, the ribs will not be tough or dry, but rather fall-off-the-bone tender and juicy.
While competition judges and some pitmasters are not so keen on fall off the bone ribs, your only judges are going to be your friends and family.
And most backyard food critics like their ribs to fall off the bone.
3-2-1 ribs are a good starting point if it’s your first time cooking pork ribs. From there you can modify your method to suit your individual preferences.
When using the 3-2-1 method, you can still add flavor just as you like it.
A crucial point is the wrapping. At this stage of the cook, you can add whatever flavor you like. Your ribs will then have a couple of hours to sit in these flavors and really soak them up.
Step by step guide to 3-2-1 Pork Ribs
- Start by removing the membrane.
- Season both sides of the ribs with a rub of your choosing. If you are after a great rub recipe, have a look here.
- Set your grill up for indirect smoking. You will want to reach 225-250°F.
- Place the seasoned ribs in the smoker, put on the lid and let them smoke for 3 hours.
- After 3 hours, take out your ribs and place them on a piece of foil big enough to wrap the ribs securely. Make sure you sit the ribs meat side down, so that the bones don’t tear the foil.
After your ribs have been cooking for 3 hours it is time to wrap them. This is the point at which you can add some extra flavor according to what you like.
If you are a fan of rich, sweet ribs, you can check out the video below from Malcom Reed of howtobbqright.com. He adds some butter, brown sugar and honey before he wraps the ribs up.
Alternatively, you could replace the honey with Apple Cider for a hit of tartness.
Once you have added your sauce, time to throw them back on the heat.
- Seal up the foil so that it is airtight. Place the wrapped up ribs back in the smoker, with the temperature at around 225°F.
- Let the ribs cook like this for a further 2 hours.
- Open up the foil to check if the ribs are done. You can do this by wiggling the bones. They should feel as if they could be pulled out of the meat without much resistance. Be careful not to get burnt by the steam that escapes as you unwrap the ribs.
This is another point at which you can stamp your individuality on the ribs. Brush them with your favorite barbecue sauce before for the final step of the journey.
- After brushing the ribs with sauce, sit them back on the grill, bone side down, and finish off the cooking at 225°F for 30 minutes – one hour.
Alternatives to the 3-2-1 Method
As we mentioned, not all pitmasters are fans of the 3-2-1 method.
The main issue people have, is that wrapping ribs in effect boils them. This can make the bark soft and the meat mushy rather than tender, and the taste a little washed out
We should point out that the vast majority of people will love the tenderness and flavor, and won’t care about this issue.
The issues with the 3-2-1 method comes down to the amount of time that the meat spends in the foil. Steven Raichlen, of barbecuebible.com, has a solution. He suggests a 3-1-1 method might be a better approach.
As the name suggests, the ribs are cooked in the foil for 1 hour instead of 2.
Aside from this slight adjustment, the method is the same as the 3-2-1 approach.
Should you Cook your Ribs Naked, Sauced or Spritzed?
Most people like the sound of ribs slathered in sauce. And we’re not saying this is wrong by any means. But it is worth considering your options when it comes to finishing off your ribs.
Naked ribs
One option is naked ribs. Sounds sketchy, but all it means is you don’t flavor your ribs with anything – just let the flavor of the meat itself and the smoke shine through.
To accomplish this, follow the steps we have discussed, but take a pass on the rubs, mustards and sauces.
Some pitmasters will still use some salt and pepper. But just how naked you like your ribs is a decision only you can make.
Saucy ribs
If you are still keen to use some sauce, instead of slathering it on think, why not try sizzling the sauce.
Meathead Goldwyn, of amazingribs.com outlines the how and the why of sizzling the sauce below:
Meathead Goldwyn, How to make the best bbq ribs you ever tasted
“Now here’s a trick I like: Sizzle on the sauce.
Put the ribs with sauce directly over the hottest part of a grill in order to caramelize and crisp the sauce.
On a charcoal grill, just move the slab over the coals. On a gas grill, crank up all the burners. On a water smoker, remove the water pan and move the meat close to the coals.
On an offset smoker, put a grate over the coals in the firebox and put the meat there. With the lid open so you don’t roast the meat from above, sizzle the sauce on one side and then the other.
The sauce will actually sizzle and bubble. Stand by your grill and watch because sweet sauce can go from caramelized to carbonized in less than a minute!”
This is certainly a good way of making sure you don’t lose any drips of your favorite sauce.
While it can be easy to fall into the trap of believing more is more when it come to flavor in barbecue, a small amount of well adhesed, caramelized sauce is sure to bring something special to any barbecue.
Spritzed or Basted
Don’t let yourself be bullied into spritzing your ribs just because you think that is what you have to do.
In fact, there is a case both for spritzing and not spritzing. And whether it is right for you really comes down to how you like your barbecue.
If you prefer your ribs with a crunchy, spicy crust with more of a punch, skip the spritzing and mopping.
If you like your ribs a little plumper with a more subtle flavor, then perhaps spritzing or mopping is something you might want to add to your rib smoking routine.
Should You Wrap Your Ribs?
We have covered a lot of ground so far and there is a lot of information to absorb. However, some of you may still have a question hanging around in the recesses of your minds.
The question being: “After all is said and done, should I wrap my ribs or not?”
There just seems to be so many ifs and butts about it (mind the pun).
The bottom line is this. Yes, wrapping your meat will speed up the cooking process and tenderise the meat.
But, there is a fine line between tender meat and soggy meat. In a similar vein, wrapping can make your crust rubbery – and a rubbery crust is not appetizing at all.
If you don’t wrap right, soggy meat and a rubbery crusta are a real possibility.
Barbecue pros like Steven Raichlen and Meathead Goldwyn are both wary of being too liberal with the Texas Crutch (or wrapping the meat).
Meathead Goldwyn sums it up nicely when he says:
‘I recommend it (wrapping) only for barbecue competitions when the tiniest improvement can mean thousands of dollars. Skip it and you’ll still have killer ribs.’
Meathead Goldwyn, How To Make The Best BBQ Ribs You Ever Tasted
While it does have its place in competitions, perhaps you would do well to skip the 3-2-1 method at times and see how you go without wrapping, you might be surprised at the results.
How to Tell if Your Ribs Are Cooked
There all sorts of calculations that we could go into here that take into account time, temperature and height above sea level.
But knowing whether your ribs are done is really quite straightforward.
When you think your ribs might be done, pick them up with your tongs in the middle of the rack. They should bow. At the point where they bend, have a look at the meat. There should be visible cracks in the bark.
A small crack means you could let them cook a little longer, but a large, deep crack means they are done.
They should look as if they might almost break in two, and the ends of the ribs should still be touching the grill plates even though you have lifted the rack in the middle.
Don’t be concerned if your ribs are done at different times. This is quite normal. If one rack is done before the others, wrap it in some foil, wrap a towel around it and stick it in a cooler (minus the ice, obviously).
This should keep your ribs at the right temperature until the rest are ready to go.
Wrapping it up
There’s no one best way to prepare barbecue ribs. From our experience, if you are cooking for an average crowed, the 3-2-1 method will give you the best results.
But you are free to experiment, try and tweak the times and what you put in the foil when you wrap.
Do you have a secret tip for preparing ribs? Let us know in the comments below. And if you found this article helpful, don’t forget to share!

Last Updated on August 17, 2020 by Judith Fertig

Leave a Reply